
Multi-TTY Emacs on Gentoo and Ubuntu
May 24, 2007 at 01:59 PM | categories: emacs, linux | View Comments(Historical note Sep 2008: The 'ec' script below is no longer (or shortly will not be) required, as there is now a patch that enables emacs as a frameless daemon)
(Historical note May 2008: This post is now over a year old. Multi-TTY Emacs is now part of the main Emacs CVS tree. Most of this post is still applicable, but the build instructions are very much out of date and for the most part are unnecessary as the multi-tty patch has now made it into most distros. It should just be an 'apt-get install emacs-snapshot' away)
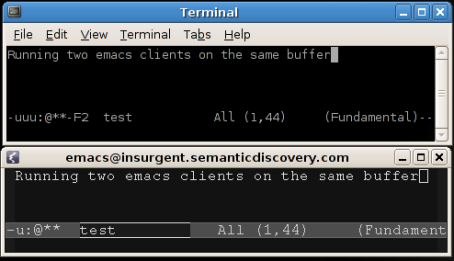
Multi-TTY Emacs is one of the most useful peices of software I've seen in a long time. Emacsclient, the underlying interface for multi-tty, has been around for a while. It allows someone to connect to a long running Emacs session and it avoids the long startup time Emacs usually has. However, it only works in a graphical environment. Multi-TTY Emacs allows us to do the same from either a graphical environment or from a simple terminal (tty).
Here's a typical use case: I'm at home and I'm using Emacs from within X-windows. I'm using the wonderful IRC client, ERC, and asking a question in #python, #emacs, #gentoo etc. but no one seems to be paying any attention and no one is answering my question right away. Oh well, it's time for me to head off to class or work. I leave Emacs running at home but since I forgot to enable chat logs, it's rather difficult for me to connect remotely and find out if anyone has responded to my question. With Multi-TTY, I can ssh into my home computer and bring up Emacs in a text console and check my ERC buffer even though I originally started Emacs graphically from X-Windows. Neat.
You can also see a video of it in action
Multi-TTY is contained in the CVS version (23) of Emacs. Version 23 is still a (tiny) bit rough around the edges, so don't blame me if while using it it deletes all your files and destroys your life in general. It won't, but caveat emptor. I am now running multi-tty on Gentoo and Ubuntu Feisty Fawn. Here's how:
Gentoo
On my laptop I run Gentoo Linux. Getting the latest version of Emacs on Gentoo was a breeze! :
- Setup Layman
- Add the emacs overlay: sudo layman -a emacs
- Add the following USE flags for app-editors/emacs-cvs: sudo flagedit app-editors/emacs-cvs X Xaw3d alsa gif gzip-el jpeg lesstif png sound spell tiff toolkit-scroll-bars xpm -gtk -hesiod -motif -source.
- GTK support is explicitly turned off as it causes problems with multi-TTY. This is no biggie for me as I always have (menu-bar-mode -1) and (tool-bar-mode -1) set.
- Emerge: sudo emerge emacs-cvs -va
- Tell the system to use the new emacs: sudo eselect emacs set emacs-23-multi-tty
Ubuntu
Ubuntu was much more difficult to setup correctly because the repositories don't have the CVS version yet (emacs-snapshot is 22). So, I've compiled it from source myself and once I clean up my instructions I will publish a HOWTO as well as my .deb package.
Update: See my new Ubuntu specific post for build instructions
Usage
Connecting to an already running emacs session is quite easy:
- In the main emacs session run M-x server-start
- Now just run emacsclient -c and you should see a new window pop up that has all the exact same buffers. If you are on a non-graphical terminal you'll likewise get the same emacs session albeit in text mode.
I found some excellent tips from sness.net for making this even easier. Here are my variations on his methods:
Make a new file somewhere in your path called preload_emacs:
#!/bin/bash
# Usage: preload-emacs <name> [<waitp>]
#
# Preloads the Emacs instance called NAME in a detached screen
# session.  Does nothing if the instance is already running.  If WAITP
# is non-empty, the function waits until the server starts up and
# creates its socket; otherwise it returns immediately.
# Visit http://www.enigmacurry.com
# based on http://emacslife.blogspot.com/2007/05/multi-tty-emacs.html


name="$1"
waitp="$2"
screendir="/var/run/screen/S-$USER"
serverdir="/tmp/emacs$UID"
emacs=/usr/bin/emacs

if [ -z "$name" ]; then
    echo "Usage: preload_emacs <name> [<waitp>]"
    exit 1
fi

if [ ! -e "$screendir"/*."$name" ]; then
    if [ -e "$serverdir/$name" ]; then
    # Delete leftover socket (for the wait option)
    rm "$serverdir/$name"
    fi
    screen -dmS "emacs-$name" "$emacs" -nw --eval "(setq server-name \"$name\")" -f server-start
fi
if [ ! -z "$waitp" ]; then
    while [ ! -e "$serverdir/$name" ]; do sleep 0.1; done
fi
Running preload_emacs -s ryan will now create an emacs server named 'ryan'. It loaded emacs in a screen session so that it will be able to be a long running process (Emacs apparently cannot run without an interface, hence we run it in a screen session to hide it away out of sight.)
To connect, we run emacsclient -c -s ryan. Typing plain old emacs here will load an entirely new Emacs session, which isn't really what we want. To make it a bit easier I created a shell script called "ec" that will load an emacsclient with these settings automatically:
#!/bin/bash -l
SERVERNAME=ryan
#Attempt to connect to an existing server
emacsclient -c -s $SERVERNAME $*
if [ $? -ne 0 ]
 then
 #Start a new emacs server and connect
 preload_emacs $SERVERNAME 0
 emacsclient -c -s $SERVERNAME $*
fi
Now when I type ec it will automatically attempt to connect to an already running emacs server named ryan. If it is not running, it will transparently create the server and then connect to it.
If you make "ec" your system's default editor, you'll now be able to use a lightning quick version of emacs for all your editing needs!
Resizing a LUKS / DM-Crypt / cryptsetup filesystem
April 28, 2007 at 06:26 PM | categories: linux, uncategorized | View CommentsI run Gentoo linux on my laptop. I love it because it's based on a constantly updated rolling release which means I get all the latest software when I want it. One of the side benefits of running Gentoo is that I get to do all of the cool linuxy stuff before the other distros get it: Like encrypting my entire root filesystem.
I used to be running Edgy Eft on my laptop before deciding to go back to Gentoo. So I only installed Gentoo on a 20GB partition and left Edgy in a 60GB partitition. I find myself using Gentoo 100% of the time and have all but abandoned Edgy on the laptop (I have nothing against Ubuntu by the way, it's great, and I maintain several other Ubuntu machines).
So, now that I have a few hours spare time today, it was time to get rid of Edgy and resize the Gentoo filesystem to use the entire hard drive. This is usually done with a fine tool like Gparted, but since this is an encrypted filesystem it's not quite that easy.
First things first, backup the partition to another machine:
Run netcat on another machine where you want to store your backup:
nc -l -p 80000 > /path/to/backups/your_image_name.img
Now on the machine you want to backup (substitute sda1 with your partition name):
dd if=/dev/sda1 | nc hostname_of_2nd_machine 80000
This will transfer an image of the partition to the second machine at an incredibly fast speed (I love netcat!)
Resize the partition:Boot up on your Gentoo Live CD.
Run fdisk (or your favorite clone), and jot down the start and end block of the partition you want to keep. In my case it was the first partition and it was on block 1.
Now delete all of the partitions you want to delete as well as the encrypted partition. "WTF?" I hear you say? Yes, that's right, DELETE the encrypted partition. This doesn't actually delete any data mind you, and as long as you correctly remembered the start and end block of the partition you are perfectly safe in doing this.
Now create a NEW partition with the same start block as you originally had. Make the end block anything larger than the original end block. Save your changes.
What we've done at this point is resized the partition which is only part of what we need. We now need to resize the filesystem contained inside the partition.
Now decrypt/map your encrypted partiton however you do it. In my case I do the following:
gpg --decrypt key.gpg 2>/dev/null | cryptsetup luksOpen /dev/sda1 root
Run fsck on it:
fsck -f /dev/mapper/root
And resize it with an appropriate tool (like ext2resize for ext3)
resize2fs /dev/mapper/root
resize2fs will resize the filesystem to the size of the containing partition.
And you're done. Reboot your machine and you'll have more hard drive space available.
GNOME: kiosk mode (make any app fullscreen)
February 17, 2007 at 01:07 PM | categories: gnome, linux | View CommentsI seem to remember a long time ago that GNOME had a user definable shortcut that could make any application fullscreen. I can't seem to find that in the Gnome keyboard shortcuts dialog anymore.
Update: I have since found the functionality and thus invalidated this entire post! When will GNOME learn to make things more obvious?? The short answer: Set a keybinding for /apps/metacity/window_keybindings/toggle_fullscreen in gconf-editor.
Also, if you're using Beryl instead of metacity, this option is reasonably easy to find in the beryl settings manager: "General Options"->"Shortcuts"->"General Options"->"Bindings"->"Toggle Window Fullscreen"
I like GNOME, I really do. But it's typical of the developers to hide useful things like this. Sure, it unclutters the preference dialogs.. but it sure would be nice to be able to do what should be (and even once was) simple, useful things.
Anyway, I've found a way to get that functionality back. Download wmctrl from your package manager and then do the following:
- Run "gconf-editor" as your normal user
- find Apps->metacity->general_keybindings
- Find the entry called run_command1 (or any other number that is blank)
- Enter "<Alt>F11" for a value. You can use any shortcut combination you want, it's just that a lot of applications have F11 has an inbuilt key for fullscreen mode, so Alt-F11 seems like a good shortcut for every other application while still not being a common keystroke that might interfere with others.
- Now find Apps->metacity->keybinding_commands (it's directly below general_keybindings)
- For command_1 enter "wmctrl -r :SELECT: -b toggle,fullscreen"
- Close gconf-editor
After all that, you should understand my frustration with GNOME. GNOME used to have a simple way of making custom keybindings too, and now it's tucked away in a really complex regedit style interface. Disgusting really.
Anyway, if you followed all of that, you should now be able to press Alt-F11 and you'll get little crosshairs for your mouse cursor. Click any window with those cross hairs and it will make it fullscreen. Press Alt-F11 and click the window once more and it will return to the original size it was beforehand.
Gentoo Linux on new HP dv8000z
November 27, 2005 at 07:16 PM | categories: linux | View CommentsMy employer was kind enough to buy me a new laptop last week. It's a brand new HP dv8000z. I struggled over the Thanksgiving holiday to install Linux on it. This laptop is VERY new. It wasn't even on HP's website a couple of days prior to when it was ordered. Now, if you've ever installed Linux on brand new hardware (and a laptop at that), you'll know that it can be quite challenging. So, as I wasn't able to find anyone else that detailed how to install Linux on this new laptop, I thought I would chronicle my successes (and failures) thus far.
My first attempt to install anything on it was Kubuntu 5.10 'Breezy.' It got all the way through the installation and it came up to a KDM login screen at the full monitor resolution. You can't beat that! However as soon as I entered my username and password the system was locked hard. I rebooted into console mode and did a 'startx' .. resulting in a very similar lockup. I messed around with the Xorg.conf file for a while but I finally gave up.
Ubuntu is one of my favorite distros. Everytime I have installed it, it Just Works. This is the first time I've seen it malfunction so horribly. On my desktop machine I run Gentoo (athlon XP). I promised myself that I would only run Gentoo on one machine (hey my time is money and Gentoo requires a lot of it compared to Ubuntu). However I started to think 'Okay.. this laptop is brand new.. bleeding edge... what else is bleeding edge? Well that's Gentoo..' So I started with a stage 3 tarball for amd64 (2005.1-r1) and got a minimal console-only installation before I left for my parents house for Thanksgiving.
Kernel
I am running gentoo-sources-2.6.14-r3. Many people have emailed me who are having problems with 2.6.15 versioned kernels. I have not done any testing of it myself. However, judging by the number of emails I've been receiving on this topic, there does seem to be an issue. I would suggest using gentoo-sources-2.6.14-r5 (as r3 isn't in portage any longer). One user has reported success with hardened-sources-2.6.14-r3 as well. My .config file for 2.6.14-r3 is below in the Miscellenious section.
Graphics
After installing Xorg 6.8.2-r4 I tried running 'xorg -configure' ... this was pretty bad: it configured everything but it only detected the graphics as a VGA card at 640x480 and 8bit color. I had compiled my kernel (2.6.12) with all the radeon support I could find, so I thought I would try to force the 'radeon' module. X just exited saying 'no device found.' So it seemed to me that the Xorg driver knows nothing about my Radeon 200M. I found that I hadn't installed the latest Xorg (6.8.2-r6).. so I upgraded. Same deal. I also found I hadn't installed the latest kernel (2.6.14). So I did that. I installed the official (closed source) ati drivers fglrx and played around with that for a while. This seemed to do something. The screen went black but didn't do anything after that. The hard drive LED was blinking though so it seemed as if X was actually starting up GNOME. Disabling direct rendering fixed that problem. So, now I have Xorg running with full 2d acceleration at 1680x1050 resolution but no 3d acceleration (glx is still enabled, but it runs with Mesa. glxgears runs at about 400fps). So it's probably an issue that will get resolved as ATI releases new drivers, or Xorg or the kernel gets upgraded. I'm moderately pleased for the time being.
Here is my Xorg.conf (No 3D, Look below for one with 3d acceleration)
UPDATE 01/11/05: I just got DRI working! In the BIOS set "UMA+Sideport" and 128M of shared video memory in the video preferences, and then uncomment the "Load 'dri'" in xorg.conf (line 74 in mine) (Thanks Levent!). glxgears now runs at 1264.600 FPS, which is a good improvement!
Here is my Xorg.conf with 3d acceleration
Graphics part2: External VGA
This laptop has an external VGA port on it. This allows you to do several things utilizing two displays. I don't really have a use for Xinerama as I normally use two computers connected with Synergy instead, although this laptop will do Xinerama just fine.
What I did want to be able do though was to take my laptop into my living room and hook it up to my television (which has VGA input) and watch some movies that are on the laptop's hard drive. The problem is this: In order to display movies at decent frame rates, video players use a feature of the video card called an overlay. On the ATI Radeon Xpress 200M, they do not support overlay on the secondary display. So although I was able to get the laptop to display on my TV fairly easily, if you try to play a video, all you'll see is a big blue screen. If you turn off the overlay feature completely, then video plays, but is very choppy.
The solution is to make the external VGA port the primary display instead of the secondary one. This can be accomplished by editing your xorg.conf file. This is the relevant change:
Change from this:Option "DesktopSetup" "(null)"To:
Option "DesktopSetup" "0x00000001"
What that will do is when you start X it will turn off the laptop's LCD and initialize the external monitor as the primary display, this time with the overlay feature enabled.
I connect my laptop to a Viewsonic N3250w HDTV. It has a native resolution of 1360x768 which the Radeon 200M will happily display.
Here is my Xorg.conf optimized for the N3250w
I then have two files in /etc/X11. 1) my xorg.conf which is my normal setup just using the laptop's LCD. 2) my xorg.TV.conf which I use to display on my television.
I don't use a display manager so I normally use 'startx' to start X-windows. To display on the TV, I instead type 'startx -- -config xorg.TV.conf'
Wireless
The wireless card in this laptop is the Broadcom BCM4318. This works with ndiswrapper. You need to download the 64 bit windows driver for this to work. I lost the link where I downloaded this, but here is a local copy
Just do the following:tar xfvj Broadcom-BCM4318-64bit-windows-driver.tar.bz2 cd Broadcom-BCM4318-64bit-windows-driver emerge ndiswrapper ndiswrapper -i BCMWL5.INF modprobe ndiswrapper
Synaptics Touchpad
Although, the touchpad kinda works, it really freaks out occasionally. The movement is always fine, but clicking on things sometimes takes multiple times to get right or quits working completely. I'm using an external mouse now exclusively which works fine. I really should attempt to get this working properly as it's a pain when I don't have a mouse handy.
This appears to be working just fine. However it's configured right now as a generic PS2 mouse. This means that the scroll area of the mouse is still not working, which might be nice to have work. There is a Synaptics driver that I should look into at some point. I'm not terribly motivated to do so because I almost always plug in an external mouse anyway.
Sound
This Just Worked. The laptop has an ATI IXP AC'97 sound card. I enabled the ATI IXP chipset in the ALSA section of the kernel configuration. That was about all there was to it.
Conclusion
It took a while but this laptop is starting to really shape up. Here are some of the best things about this laptop:
- 17" screen (1680x1050 resolution). I can bring up 4 non-overlapping terminals on the screen and still have room left over. Bliss!
- Room for TWO 120 GB hard drives. I have 80GB in there right now with a 100GB on the way.
- a full keyboard including a number pad!
- AMD Turion64 2.2Ghz processor. This was pretty powerful.. In hindsight I could have easily done a stage1 tarball on this thing in not too much more time.
If anyone out there is configuring Linux on this laptop and is either having problems or has found a solution to one of my problems, go ahead and make a comment on this article (or email me if you prefer). I'll do the best I can to assist (or be gracious)!
Miscellaneous
The output of lspci and my /proc/cpuinfo
My make.conf
Here's some screenshots (click the image for the gallery):


Emacs movement keys
May 13, 2005 at 12:45 AM | categories: emacs, linux | View Comments
whoa. I just realized something cool in Emacs... hold down control and use the arrow keys and you can move around by words and paragraphs.
... I guess I should have RTFM years ago huh? ... I'm such a dolt.
- Ryan
« Previous Page
Contact me
Friends
- brainjack>>
- Duane McGuire - My Dad
- Erin McGuire - My Sister
- Heavy Noir
- OneWatt
- Six Mile Village
Liberty Links
Categories
- android (rss) (1)
- backups (rss) (1)
- blogofile (rss) (1)
- car computer (rss) (1)
- cats (rss) (1)
- class work (rss) (1)
- cool stuff (rss) (9)
- curlbomb (rss) (1)
- diy (rss) (1)
- economics (rss) (2)
- electronics (rss) (1)
- emacs (rss) (13)
- enigma curry (rss) (8)
- enigmacurry.com (rss) (1)
- free state project (rss) (3)
- games (rss) (1)
- geek humor (rss) (3)
- geeky (rss) (2)
- gmail (rss) (1)
- gnome (rss) (1)
- hd-dvd (rss) (2)
- humor (rss) (2)
- java (rss) (3)
- letters (rss) (2)
- liberty rants (rss) (42)
- linux (rss) (20)
- lisp (rss) (1)
- michael badnarik (rss) (2)
- mitt romney (rss) (3)
- music (rss) (1)
- n800 (rss) (1)
- openoffice.org (rss) (1)
- php (rss) (1)
- pissed off (rss) (3)
- python (rss) (31)
- ron paul (rss) (9)
- security (rss) (5)
- software (rss) (1)
- stupidity (rss) (4)
- uncategorized (rss) (6)
- videos (rss) (9)
Archives
- May 2016 (1)
- July 2011 (1)
- September 2010 (1)
- July 2010 (2)
- April 2010 (1)
- January 2010 (1)
- December 2009 (1)
- July 2009 (1)
- May 2009 (2)
- March 2009 (1)
- January 2009 (4)
- December 2008 (3)
- November 2008 (2)
- October 2008 (1)
- September 2008 (1)
- August 2008 (3)
- July 2008 (1)
- May 2008 (2)
- April 2008 (2)
- March 2008 (1)
- February 2008 (2)
- January 2008 (1)
- December 2007 (1)
- November 2007 (5)
- October 2007 (7)
- September 2007 (3)
- July 2007 (3)
- June 2007 (3)
- May 2007 (3)
- April 2007 (3)
- February 2007 (2)
- November 2006 (1)
- October 2006 (3)
- July 2006 (1)
- June 2006 (1)
- May 2006 (2)
- April 2006 (10)
- February 2006 (2)
- January 2006 (6)
- December 2005 (1)
- November 2005 (5)
- October 2005 (3)
- September 2005 (2)
- August 2005 (5)
- July 2005 (1)
- June 2005 (2)
- May 2005 (7)