
My Model M Keyboard Dyed
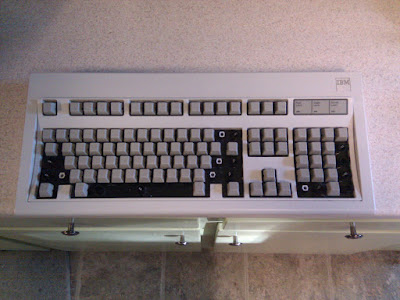
July 17, 2010 at 07:13 PM | categories: cool stuff | View CommentsI've been using the same IBM Model M keyboard for about 6 years now. I never thought I would see the day when it would quit working. I love this keyboard -- the buckling springs deliberately and assuredly clicking and clacking beneath my fingers blow the pants off any cheap-ass keyboard you get for "free" with your factory Dell PC. It's amazing that the best keyboard ever made was actually one of the very first. Created in 1985, the Model M set the standard to beat, but the quality of PC keyboards over the years has only gone downhill. Thank goodness Unicomp still makes these things. Otherwise, I'm not sure what I would ever replace this keyboard with... maybe a Das or a Deck.
Luckily, I don't have to replace it. It hasn't died yet, and probably never will.
Chris McDonough recently wrote an excellent article on the 25 years of the Model M. Since reading it, I've been thinking quite a bit about my trusty Model M and I decided to give it an early 25th birthday present: some new colors!
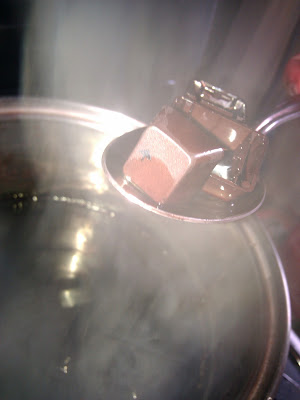
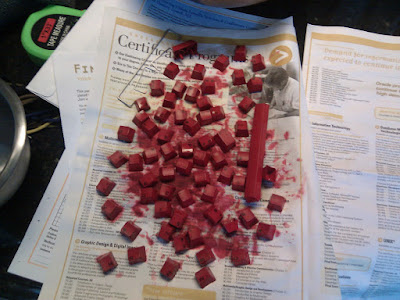
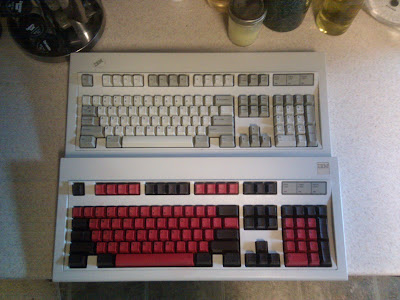
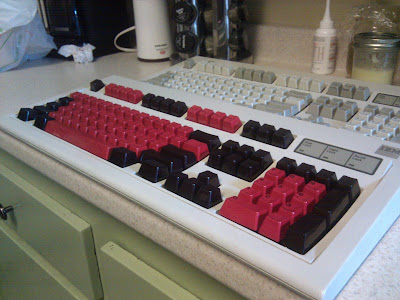
I followed a guide from Overclock.net describing the process of applying rit dye to the keys. I've used other keyboards that had paint jobs on them before, but the rit dye process is soo much nicer. With paint, you always get a sticky paint feel on the keys and of course it also covers up the letters on the keys permanently. The rit dye, on the other hand, permeates the plastic and leaves no residue on the surface at all. In fact, you can still see the letters quite well.
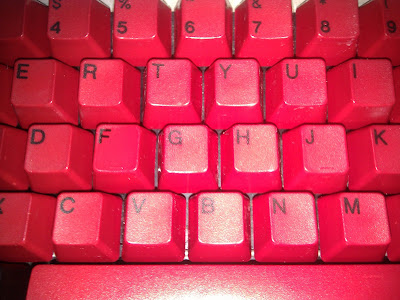
I liked the red and brown combination used in the Overclock.net guide, although I left the original color differentiation of the model M intact: letters and numbers red, and the meta keys and some of the F keys brown. The red keys turned out fantastic, the letters on them are very distinctive. However, the brown turned out a bit differently; being much darker, almost black, it all but obscures the markings on the keys. No big deal though, I guess my new Model M is half-way to a Das Ultimate after all. :)
Audacious Dynamic Playlist powered by inotify
July 13, 2010 at 12:22 AM | categories: python, linux | View CommentsI was playing around with StreamRipper today to record a shoutcast stream I enjoy, and I thought to myself: wouldn't it be nice to be able to continuously play all the files I've downloaded without having to manually queue the new files in Audacious?
So, I scratched an itch. With a little DBUS, pyinotify, and an optparse wrapper, I now have a tool to automatically add the tracks to my Audacious playlist. You can grab the latest version on github.
Streamripper does have a relay option (-r) to allow you to listen to the same stream as you're ripping it, and if that's what you want, the following script is superfluous. However, what I wanted was something slightly different: I didn't necessarily want to just listen to the stream live, instead, I wanted the ability to jump around between the tracks already downloaded, exploring different songs, but with the list of tracks ever expanding. That's what this script allows.
You'll need python-dbus and setuptools installed, then just install with:
easy_install http://github.com/EnigmaCurry/audacious-plugins/zipball/master
Startup StreamRipper with your favorite audio stream and point the tool at your target directory:
python -m ec_audacious.dynamic_filesystem_playlist /path/to/your/streamripper_location
Now when StreamRipper creates a new file, it will get automatically (instantaeneously actually, thanks to inotify!) to your Audacious playlist.
Alternatively, you can use the streamripper wrapper script that I've included to start both the filesystem monitor as well as streamripper in one go:
Put the following in your .bashrc file or somewhere equivalent:
alias streamripper="python -m ec_audacious.streamripper"
Then whenever you run streamripper, you'll actually be running the wrapper script instead:
streamripper http://your-cool-stream.com:8000 --audacious
By aliasing streamripper to point to the ec_audacious.streamripper wrapper script, we're effectively adding a new option to streamripper called --audacious which spawns our filesystem monitor.
Contact me
Friends
- brainjack>>
- Duane McGuire - My Dad
- Erin McGuire - My Sister
- Heavy Noir
- OneWatt
- Six Mile Village
Liberty Links
Categories
- android (rss) (1)
- backups (rss) (1)
- blogofile (rss) (1)
- car computer (rss) (1)
- cats (rss) (1)
- class work (rss) (1)
- cool stuff (rss) (9)
- curlbomb (rss) (1)
- diy (rss) (1)
- economics (rss) (2)
- electronics (rss) (1)
- emacs (rss) (13)
- enigma curry (rss) (8)
- enigmacurry.com (rss) (1)
- free state project (rss) (3)
- games (rss) (1)
- geek humor (rss) (3)
- geeky (rss) (2)
- gmail (rss) (1)
- gnome (rss) (1)
- hd-dvd (rss) (2)
- humor (rss) (2)
- java (rss) (3)
- letters (rss) (2)
- liberty rants (rss) (42)
- linux (rss) (20)
- lisp (rss) (1)
- michael badnarik (rss) (2)
- mitt romney (rss) (3)
- music (rss) (1)
- n800 (rss) (1)
- openoffice.org (rss) (1)
- php (rss) (1)
- pissed off (rss) (3)
- python (rss) (31)
- ron paul (rss) (9)
- security (rss) (5)
- software (rss) (1)
- stupidity (rss) (4)
- uncategorized (rss) (6)
- videos (rss) (9)
Archives
- May 2016 (1)
- July 2011 (1)
- September 2010 (1)
- July 2010 (2)
- April 2010 (1)
- January 2010 (1)
- December 2009 (1)
- July 2009 (1)
- May 2009 (2)
- March 2009 (1)
- January 2009 (4)
- December 2008 (3)
- November 2008 (2)
- October 2008 (1)
- September 2008 (1)
- August 2008 (3)
- July 2008 (1)
- May 2008 (2)
- April 2008 (2)
- March 2008 (1)
- February 2008 (2)
- January 2008 (1)
- December 2007 (1)
- November 2007 (5)
- October 2007 (7)
- September 2007 (3)
- July 2007 (3)
- June 2007 (3)
- May 2007 (3)
- April 2007 (3)
- February 2007 (2)
- November 2006 (1)
- October 2006 (3)
- July 2006 (1)
- June 2006 (1)
- May 2006 (2)
- April 2006 (10)
- February 2006 (2)
- January 2006 (6)
- December 2005 (1)
- November 2005 (5)
- October 2005 (3)
- September 2005 (2)
- August 2005 (5)
- July 2005 (1)
- June 2005 (2)
- May 2005 (7)