
Searching GameFAQs within Steam games
September 22, 2010 at 08:30 PM | categories: python, games | View CommentsTo take the edge off work, I've been playing Fallout 3 this week. Let me just say this: post apocalyptic Washington DC is huge! Thankfully, there's GameFAQs, because I don't have 40 hours a week to devote to playing games the hard way.
The problem is, 3D games are notoriously bad at recovering after you Alt-Tab out of the game to use your web browser. Luckily, Steam has a built in web browser, so that you don't need to leave the game in order to check GameFAQs, which is great... except for the fact that the Steam browser is totally lame.
See, GameFAQs are plain text files. I think that's cool; plain text is an age old geek tradition, plus it's the ultimate portable file format. However, that also makes things difficult when you're talking about a guide that is over 1MB and broken into hundreds of sections with no hyperlinks to help navigate. GameFAQ authors are a smart bunch though, they have the habit of creating unique codes for each section, essentially creating ad-hoc hyperlinks. You just use your browser's search feature to search for the code and you go right to the section you want.
And what browser doesn't have a search feature?
Oh... right, the Steam browser.
Seriously?
Seriously!?
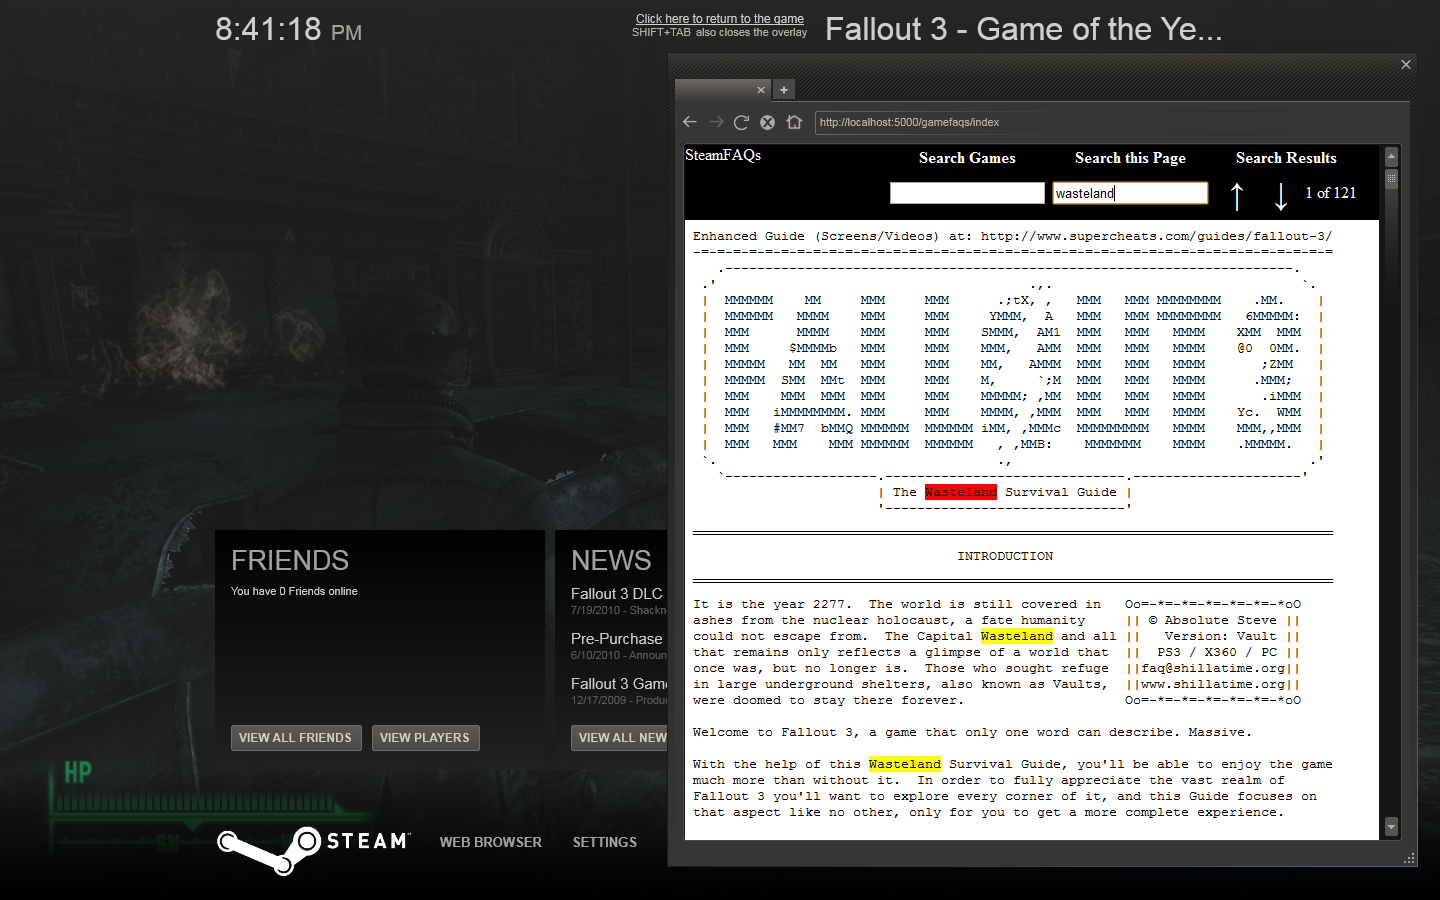
Alright fine, I'm a hacker, I can get around this. My solution was to write a GameFAQs proxy that downloads FAQs and injects them into a page that uses the jQuery highlight plugin. Slapping on a header to every page for easy navigation, gives us our very own search-in-the-browser add-on for the feature-gimped Steam browser.
Download a standalone executable and try it yourself. Yea, I probably could have made a public server, but I didn't want to get into a copyright hassle, so for now you'll just need to run it yourself on your own computer. I've tried to make it as easy as possible. If you're a Python geek and want to check out the source (or just paranoid about running a pre-compiled exe), it's over on github. If you're interested in how I compiled the Pylons application into a standalone executable with bbfreeze, checkout make.py (although it's pretty cludgy).
One more thing, this proxy is essentially scraping the GameFAQs.com website, so it's possible things could break if they change their site too much. Let me know in the comments if this thing doesn't work anymore.
Instructions for the standalone executable:
- Download the exe (Tested on Windows 7, 32 & 64 bit)
- Run the application. It's a self extracting archive, extract it wherever you want. The desktop is fine (it's just one .bat file and a directory.)
- Run start_steam_gamefaqs.bat and wait for the window to pop up.
- Leaving that window open, start your steam game.
- In the game, press Shift-Tab to bring up the Steam community page.
- Click on the web browser.
- Enter the URL : http://localhost:5000
- Search for your desired game and FAQ.
- Search the page by pressing Ctrl-F and typing in the "Search This Page" box. Pressing Enter multiple times in that box will find the next match for that search term.
Audacious Dynamic Playlist powered by inotify
July 13, 2010 at 12:22 AM | categories: python, linux | View CommentsI was playing around with StreamRipper today to record a shoutcast stream I enjoy, and I thought to myself: wouldn't it be nice to be able to continuously play all the files I've downloaded without having to manually queue the new files in Audacious?
So, I scratched an itch. With a little DBUS, pyinotify, and an optparse wrapper, I now have a tool to automatically add the tracks to my Audacious playlist. You can grab the latest version on github.
Streamripper does have a relay option (-r) to allow you to listen to the same stream as you're ripping it, and if that's what you want, the following script is superfluous. However, what I wanted was something slightly different: I didn't necessarily want to just listen to the stream live, instead, I wanted the ability to jump around between the tracks already downloaded, exploring different songs, but with the list of tracks ever expanding. That's what this script allows.
You'll need python-dbus and setuptools installed, then just install with:
easy_install http://github.com/EnigmaCurry/audacious-plugins/zipball/master
Startup StreamRipper with your favorite audio stream and point the tool at your target directory:
python -m ec_audacious.dynamic_filesystem_playlist /path/to/your/streamripper_location
Now when StreamRipper creates a new file, it will get automatically (instantaeneously actually, thanks to inotify!) to your Audacious playlist.
Alternatively, you can use the streamripper wrapper script that I've included to start both the filesystem monitor as well as streamripper in one go:
Put the following in your .bashrc file or somewhere equivalent:
alias streamripper="python -m ec_audacious.streamripper"
Then whenever you run streamripper, you'll actually be running the wrapper script instead:
streamripper http://your-cool-stream.com:8000 --audacious
By aliasing streamripper to point to the ec_audacious.streamripper wrapper script, we're effectively adding a new option to streamripper called --audacious which spawns our filesystem monitor.
Writing an OpenOffice.org Calc extension in Python
December 13, 2009 at 10:08 AM | categories: python, openoffice.org | View CommentsA very well organized group of thugs steals my money every day. I'm getting really tired of it, but I found a way to save at least some of my money so they don't steal nearly as much of it, nearly as often. For whatever reason, this gang hasn't devised a way to steal gold and silver nearly as efficiently as these little green pieces of paper that they call money. So I buy gold and silver whenever I can as a hedge against 'inflation' (which is really just their gang-speak for the wholesale-theft of my money.)
I want to keep track of how much gold and silver I've bought, when I bought it, and inevitably I'll still want to know how many green pieces of paper I could theoretically trade it all in for.
The easiest way to track all this information was to create a spreadsheet in OpenOffice.org's Calc. I created a sheet for gold purchases and another sheet for silver purchases. Everytime I make a purchase, I record the number of ounces, what form it is in (coins, bars, junk etc), who I bought it from, when I bought it, and the price I paid in FRNs (Federal Reserve Notes, aka green pieces of paper.) On another sheet I total the number of ounces I own and multiply it by the current spot price for the metal, which gives me the current price I could get if I sold it for FRNs. When tallying this total, I reference a special cell on the sheet, one that has the current spot price for gold, and another for silver.
But checking the spot price myself and manually updating those cells was just too tedious for my programmer's heart. I wanted OpenOffice.org to automatically retrieve this information for me. So, I started researching OpenOffice.org extensions (plugins).
Turns out, OpenOffice.org extensions can be written in my favorite programming language, Python (yea!), so I wrote the following extension a few weekends ago. It's on github and can be downloaded with git:
git clone git://github.com/EnigmaCurry/SpotMetal.git
If you just want the pre-compiled extension, it can be downloaded here locally:
You install it inside OpenOffice.org by going to Tools -> Extension Manager and clicking on Add and browsing to the SpotMetal-0.1.oxt file you downloaded or built yourself.
Once you have it installed, you now have a new Calc function available called SPOTMETAL which takes two arguments:
- metal - Which metal you want to look up. Can be one of
"gold", "silver", "platinum",or"palladium" - bidAsk - Whether you want the bid or the ask price. Can be either
"bid"or"ask".
The price will automatically be refreshed every 5 minutes by default, but you can also force a refresh with the Calc function called SPOTMETALREFRESH.
Here's an example OpenOffice.org spreadhseet that shows how you might track your own precious metal investment portfolio. The big button labeled "Refresh Spot Price" does what it says it does, but requires a bit more boiler-plate code in order for it to actually display on screen. In OpenOffice.org, you can see another macro called doReCalculate:
Tools->Macros->Organize Macros->OpenOffice.org BasicMetalTrackerExample.ods->Standard->SpotMetal->doReCalculate.
This extra macro is necessary to actually force the spreadsheet to request new data from the extension when you click the "Refresh Spot Price" button.
While this extension might be of use to you if you also invest in precious metals, I guess the main reason I posted this is because it took a good deal of time researching how to write a Python extension for OpenOffice.org. Check out the source code on github if you're looking to write your own extension, it's got it's own Makefile and hopefully it's documented well enough for it be useful for someone in the future.
Distributing Jython Apps in a Single JAR file
May 20, 2009 at 02:20 PM | categories: python, java | View CommentsI've been writing a lot of one-off type applications at work lately, which is always kind of a joy for me because these sorts of applications don't need to be maintained or supported in any way, which means I can write them however I want.
So I write them in Python :)
Jython allows me to interface with all the plethora of Java libraries that we use at work, and it lets me program in a language that not only I can tolerate, but one that I respect and love.
But even though these are one-off applications, they still need to be easy to use, and in some cases I won't even be the one running the application. I want these applications to just work damnit.
So, packaging my Jython application into a single executable jar file that contains all of the third party dependancies inside is my goal. I want to send the user the jar file, have them double click on it, and have it immediately start running. It can't get a whole lot easier than that.
The Jython wiki has a page about doing something along these lines. The recipe there called the Jar Method works quite well. The one drawback that it has is that all of the Java dependancies need to be exploded into the main jar root, which when you're dealing with dozens of jar dependancies, it can start to get tedious, messy, and in some cases will even violate the license of a particular library.
One-Jar is a special class loader that can load a jar file that is inside of another jar file, something that the regular class loader from Sun is incapable of doing. Using One-Jar lets my application reside inside of a jar file and contain all my dependancies as seperate jar files inside the main jar file.
I've created a sample project that shows how I normally create a new Jython project hosted inside a single jar file with One-Jar. You'll need the following tools to check out the project:
- A Java SDK (tested with OpenJDK 1.6)
- Apache Ant (tested with version 1.7)
- Git (to checkout the project)
Check out the project like so:
git clone git://github.com/EnigmaCurry/Single-JAR-Jython-Example.git
Build the project:
cd single-jar-jython-example

ant
Run the example by double clicking it or via the command line:
java -jar JythonExcelExample.jar
This is just a demonstration app, it doesn't do a whole lot, it outputs an excel file in the current directory listing some computer parts. The point of the application is to show how Jython can integrate with existing Java third-party libraries (in this case Apache POI.)
Instructions for basing your own application on this example are contained inside the README.txt file.
Jython Shell Server -- Adding a REPL to any Java app
March 01, 2009 at 02:10 PM | categories: python, java | View CommentsI love programming in Python. I get paid to write Java though. Due to Java's verboseness, and lack of a REPL, this can be very frustrating for me.
In Python, the usual way I explore a new library or mock up a new idea is to immediately start coding in Python's interactive interpreter (or REPL). This is often times more efficient than reading (let alone finding) the documentation for the library. I can quickly see if something is going to work before I code inside my larger application.
Java doesn't have an interactive interpreter.. but Jython does! However, setting up Jython, especially interfacing with an already large Java application, can be difficult. One such difficult situation I deal with at work is in Weblogic. With Weblogic, I deploy my application directly to a running Weblogic server, and I never get to see a console in this process, so how am I ever going to run a Jython interactive interpreter?
This morning I got bored and wrote up a quick solution: JythonShellServer. JythonShellServer embeds into any Java application and starts a Telnet server that serves up Jython interactive shells. You can push any Java object that you want to manipulate into Jython's local environment. Run "telnet localhost 7000" and you can use Python code to explore your entire application's running environment.
JythonShellServer works, but I only just wrote it this morning, so consider it alpha quality at the moment. Check out the project page on github.
Next Page »
Contact me
Friends
- brainjack>>
- Duane McGuire - My Dad
- Erin McGuire - My Sister
- Heavy Noir
- OneWatt
- Six Mile Village
Liberty Links
Categories
- android (rss) (1)
- backups (rss) (1)
- blogofile (rss) (1)
- car computer (rss) (1)
- cats (rss) (1)
- class work (rss) (1)
- cool stuff (rss) (9)
- curlbomb (rss) (1)
- diy (rss) (1)
- economics (rss) (2)
- electronics (rss) (1)
- emacs (rss) (13)
- enigma curry (rss) (8)
- enigmacurry.com (rss) (1)
- free state project (rss) (3)
- games (rss) (1)
- geek humor (rss) (3)
- geeky (rss) (2)
- gmail (rss) (1)
- gnome (rss) (1)
- hd-dvd (rss) (2)
- humor (rss) (2)
- java (rss) (3)
- letters (rss) (2)
- liberty rants (rss) (42)
- linux (rss) (20)
- lisp (rss) (1)
- michael badnarik (rss) (2)
- mitt romney (rss) (3)
- music (rss) (1)
- n800 (rss) (1)
- openoffice.org (rss) (1)
- php (rss) (1)
- pissed off (rss) (3)
- python (rss) (31)
- ron paul (rss) (9)
- security (rss) (5)
- software (rss) (1)
- stupidity (rss) (4)
- uncategorized (rss) (6)
- videos (rss) (9)
Archives
- May 2016 (1)
- July 2011 (1)
- September 2010 (1)
- July 2010 (2)
- April 2010 (1)
- January 2010 (1)
- December 2009 (1)
- July 2009 (1)
- May 2009 (2)
- March 2009 (1)
- January 2009 (4)
- December 2008 (3)
- November 2008 (2)
- October 2008 (1)
- September 2008 (1)
- August 2008 (3)
- July 2008 (1)
- May 2008 (2)
- April 2008 (2)
- March 2008 (1)
- February 2008 (2)
- January 2008 (1)
- December 2007 (1)
- November 2007 (5)
- October 2007 (7)
- September 2007 (3)
- July 2007 (3)
- June 2007 (3)
- May 2007 (3)
- April 2007 (3)
- February 2007 (2)
- November 2006 (1)
- October 2006 (3)
- July 2006 (1)
- June 2006 (1)
- May 2006 (2)
- April 2006 (10)
- February 2006 (2)
- January 2006 (6)
- December 2005 (1)
- November 2005 (5)
- October 2005 (3)
- September 2005 (2)
- August 2005 (5)
- July 2005 (1)
- June 2005 (2)
- May 2005 (7)